
Having trouble getting consistent 0-60’s? Hard to find the sweet spot in the RPM’s when launching? Well, do we have an easy solution for you…
The all new Launch Controller by TS Performance is the minimal wiring, plug and play solution to your launching issues. Some may even consider it a bolt in driver mod. With even a stock car, we’ve seen 0-60 times drop 2/10th’s of a second consistently with this device.
See the videos on the Launch Controller Here Below!
Let’s take a look at all the pieces of the kit here…
The Panel

- Clean, flush fit design, made out of Billet Aluminum.
- Designed to fit in the Cup Holder of the majority of vehicles.
- Adjust the RPM’s using the dial on the right using a flathead screwdriver and a 1/2 in. SAE Wrench
- Long length of wire, allowing mounting where ever you prefer.
(The purple and white wires are left without harness, allowing you to run the wire ends through smaller holes and gaps for cleaner, easier install. )
Designed to fit in your consoles cup holders, this control panel allows you to both set and lock in your desired RPM on launch, as well as setting the car in the launch sequence with the push of the red button.
The Main Harness and Module

- Plug and play system, preassembled.
- Sealed and durable case for the module.
- Plugs into your vehicles brake pedal harness.
- Integrated kill switch to fully disable the system for daily driving.
(The black and purple wire has to be wired (soldered or butt connectors) to the matching wires coming from button panel )
With as minimal as possible wiring, along with the option to completely shut the system down to avoid any accidental engagement, this perfect for those who plan on street driving their vehicle.
Harnesses A and/or B

Each harness gives you a different method of activation as well as install.
For those looking for the quickest possible reaction time, Harness A with the micro switch will be the best option for you, since the signal doesn’t travel through the brake pedal first.
For those looking for a quick reaction time, but mainly focused on 0-60’s and getting a solid launch, Harness B will be plenty suffice.
Regardless of your car’s application, you can use either harness. Harness A simply uses a micro switch to send a faster signal to the controller, allowing the vehicle to launch sooner by a very slight amount (milliseconds). Harness B simply relies on the switch in the brake pedal, which works perfect and still quickly, just not as quick as a separate micro switch.
Now onto the install…
You will need:
- 1/4 in. Socket or Wrench
- A Soldering Iron w/ solder or Butt Connectors and Crimps (Depending on Installer Preference).
- A 1/4 In. Drill Bit. IF YOU PLAN ON RUNNING WIRES THROUGH THE CENTER CONSOLE.

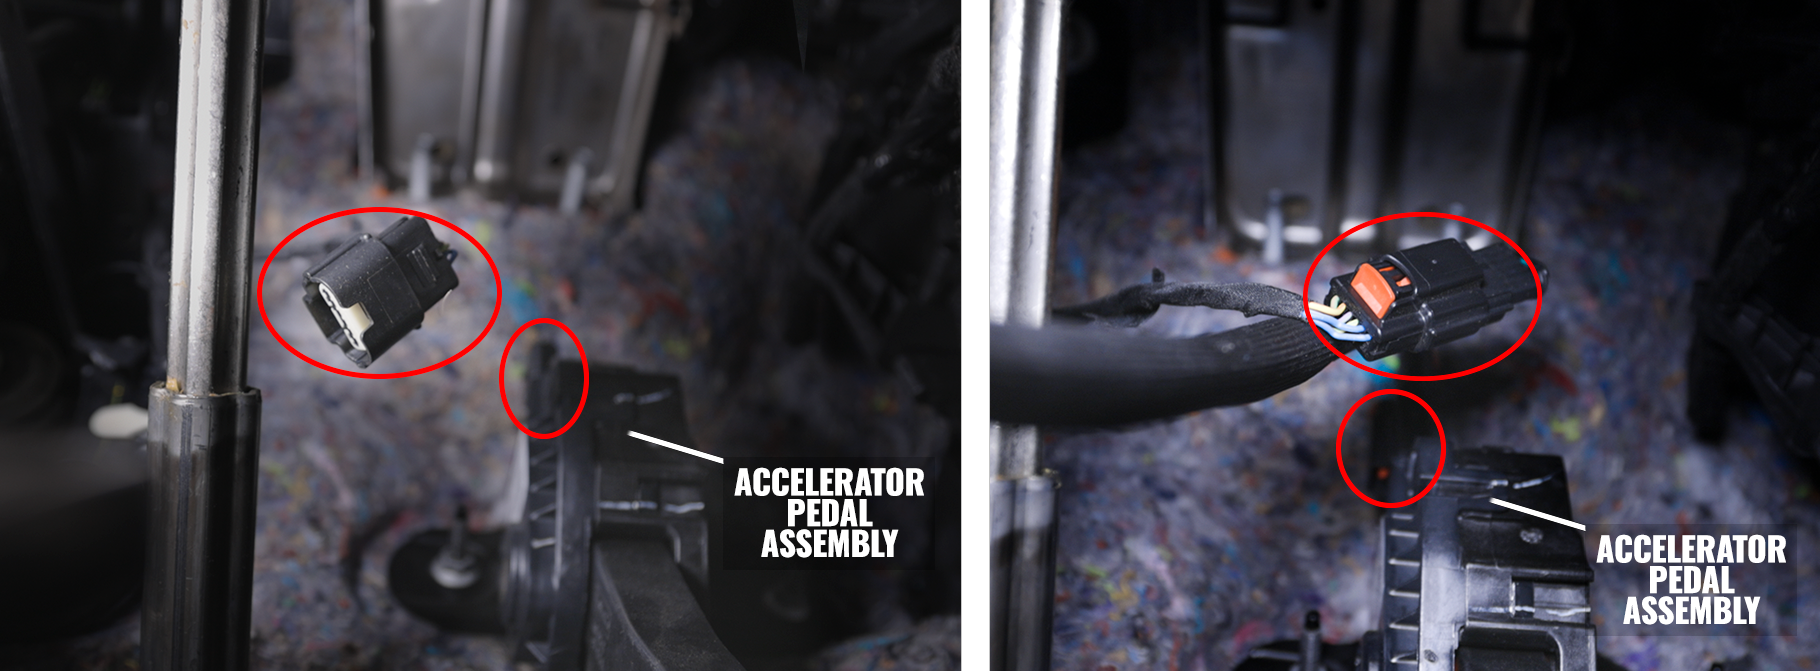
1. Locate the harness located at the top of the accelerator pedal and disconnect it by pulling the red tab back, pressing down, and pulling out.
2. Once disconnected, hook the appropiate end of the T in the main harness of the Launch Controller into the Pedal assembly. Then plug the other end of the T into the vehicle's harness.
3. Next, locate the brake pedal switch harness. While you do not have to disconnect it, you to help give a better spot to wire, you can disconnect it by pushing the tab and pulling back, similar to the accelerator pedal, just now without the red tab. We recommend also pulling the wire down from the pin at the top of the pedal assembly that holds it up and out of the way during the process.
4. Once you have it where you can wire it, you will take your loose Red wire from the main harness and tap it into the far right (Pin 1) wire on the vehicle's brake pedal harness, which is constant power.
5. Next, the white wire will tap into Pin 2 if you are running a 10r80 OR a 6r80 and using Harness A. If you are running Harness B with a 6r80 then you will tap the white wire into Pin 4.

6. Once you have checked to make sure you have the correct wires tapped, plug the brake pedal harness back into the switch on the pedal.
You are now done under the dash of the car .
7. Next, you have to choose how you wish to locate the switch panel. IF you choose to mount it in the cup holder and drill a hole to run the wires through the console, you may do so now.
8. Once you have run the wires and are happy with the location, you can then plug the small harness coming from the switch panel into the main harness, as well as using either a soldering iron or crimps, connect the purple wire on from the switch panel to the purple coming from the main harness, as well as the black wires.
9. You can now connect the main harness to the module and use either 1/4 in. socket or wrench to tighten the bolt and fully mount the harness.
You can now hide and mount the wires and module where you would like. You may want to test the system before totally hiding all the wires to ensure good connections were made.
SETUP (IMPORTANT BEFORE FIRST ENGAGEMENT)
First, make sure the dial is turned all the way counterclockwise to ensure your RPM is at idle to start.
Next, engage the system by putting the vehicle in drive, then flip the kill switch to the open and on position, while holding the brake, hit the red button, and using a flathead screwdriver, slowly turn the dial clockwise and watch your RPM's come up. Once you feel an RPM's where the vehicle is about to push through the brake or you're comfortable with, lock down the dial with the nut using a 1/2 in. wrench, hit the kill switch, and let off the brake. This should bring the RPM's back down, save your desired RPM, and ready you for the launch. You can adjust as needed, as well as adjust on the fly if you please.
1. Killswitch ON (If not already)
2. Put Vehicle in Drive (Or any selection except for Park, Reverse, or Neutral).
3. Press the brake as hard as possible.
4. Press Red Button on the Panel. (RPM's will raise)
5. Apply Full Throttle.
6. Drop the brake and LAUNCH!
By now, you're ready for LAUNCH!
Ready to buy your Launch Controller? Click Here!

About the Author
Joe, also known as “the Average Joe” is anything but your “average” automotive enthusiast, with an early influence of speed, his life revolves around anything with a motor, from race cars, street cars, motorcycles, boats and more.